How to Use Helical Bars for Lintel Repairs
Helical bars can transform existing brickwork into retrofit masonry beams or reinforced brick lintels. As the title of this guide suggests, it addresses how to fix helical reinforcement into a wall to span and fortify areas of brickwork that have little or no support. This article focuses on the method of installing the spiral reinforcing rods and explains how the system works to strengthen and repair sagging brick lintels or dropped masonry arches.
Failure in the load-bearing capabilities of brick or other masonry arch lintels is a worrying issue. One of the leading causes is the replacement of wooden or steel window frames, which contribute to supporting brickwork, with UPVC frames, that don’t. Sagging lintels and dropped arches often result in diagonal cracking above the openings and windows or patio doors that are difficult to open. Fortunately, Twistfix has a remedy that utilises its helical bars to form a reinforced brick lintel over a flat soldier course or curved masonry arch.
How does a reinforced brick beam work?
Bed joint reinforcement, added during construction, is an accepted technique for increasing shear, tensile and flexural capacity in brick, block and stone walls, making them less likely to crack. The reinforcement works with the masonry to generate lintels or beams within the walls.
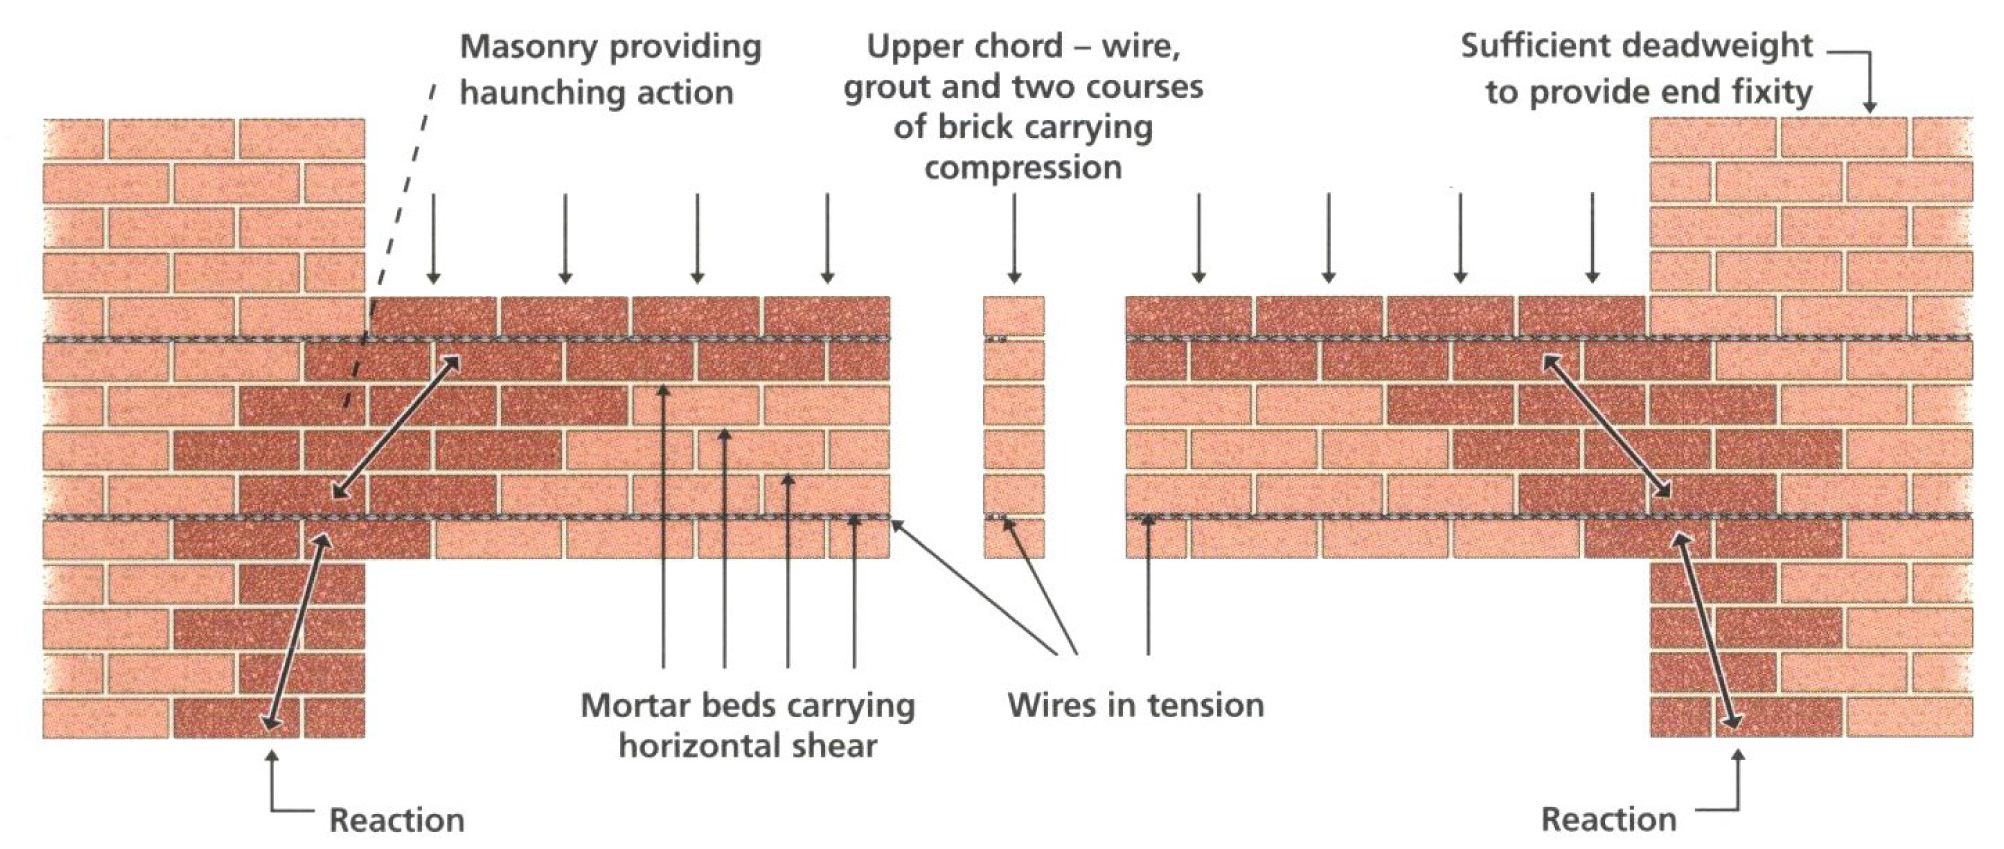
In retrofit applications, placing two sets of high-tensile helical bars into bed joints above windows, extending 500mm either side the opening, forms tendons that represent the upper and lower flanges of a deep masonry beam. The top chord of bed joint reinforcement combines with the two brick courses that surround it, to resist compression. The lower tendon acts to increase the resistance to tension significantly. The unreinforced masonry between the stainless steel bars functions as the ‘web’ of the beam, which takes the horizontal shear loads.
Sufficient weight, on the section of reinforced masonry overhanging the opening, prevents the beam bending and enables arching-action that transfers the path of vertical loads away from the head of the window or door to the masonry either side of it. The effective functioning of a beam relies on the reinforced zone having cracks filled and being free of slip planes, such as cavity trays or damp-proof courses.
What are the benefits of using helical bars for masonry reinforcement?
Helical bars are known to exhibit an extraordinary tensile strength that is double that of rebar and four times that of epoxy glass-fibre. The bars have deep winding troughs that maximise interlock within a purpose made polymer-modified grout; the reinforcement accumulates loads progressively and redistributes stress to prevent a sudden or catastrophic failure of the lintel.
The load capacity of brick beams formed using 6mm stainless steel helical bars is a function of the depth of the lintel (vertical spacing of the bars) and the span of the opening. Following tests on a weak wall built with multi-stock brick with a compression strength of around 8 N/mm² in a mortar mix of 1: 3: 12 cement: lime: sand, the Building Research Establishment has published the load capacity of reinforced brick lintels formed by our 6mm helical bars bonded in WHO-60 grout. Where the span to depth ratio doesn’t exceed seven to one, the tables show that, after applying factors of safety, lintels spanning an opening of up to 3.2m can carry a load of 2.6 tonnes.
What type of adhesive is best to bond helical bars into walls?
We recommend thixotropic WHO60®, which is a cement-based grout featuring added polymers. The BRE Load Tables are specific to the proprietary helical bars tested and bonded into walls with this purpose-made mortar. Shrink-compensated, the grout effortlessly bonds the bars to the masonry, setting in and around the deep troughs of the helix and delivering compressive strength combined with some flexibility, which safeguards against sudden failures when overloaded.
Polyester or epoxy resins are brittle once set and may cause sudden breakage of the beam when overexerted; they also have a mismatch of thermal and moisture movement characteristics that makes them less effective.
How do you fix helical bars into an existing wall to form a lintel?
Once correctly installed, helically twisted bars provide strong reinforcement to fortify lintels and give a property a new lease of life. Installation is complete in seven easy steps, which are listed below.
-
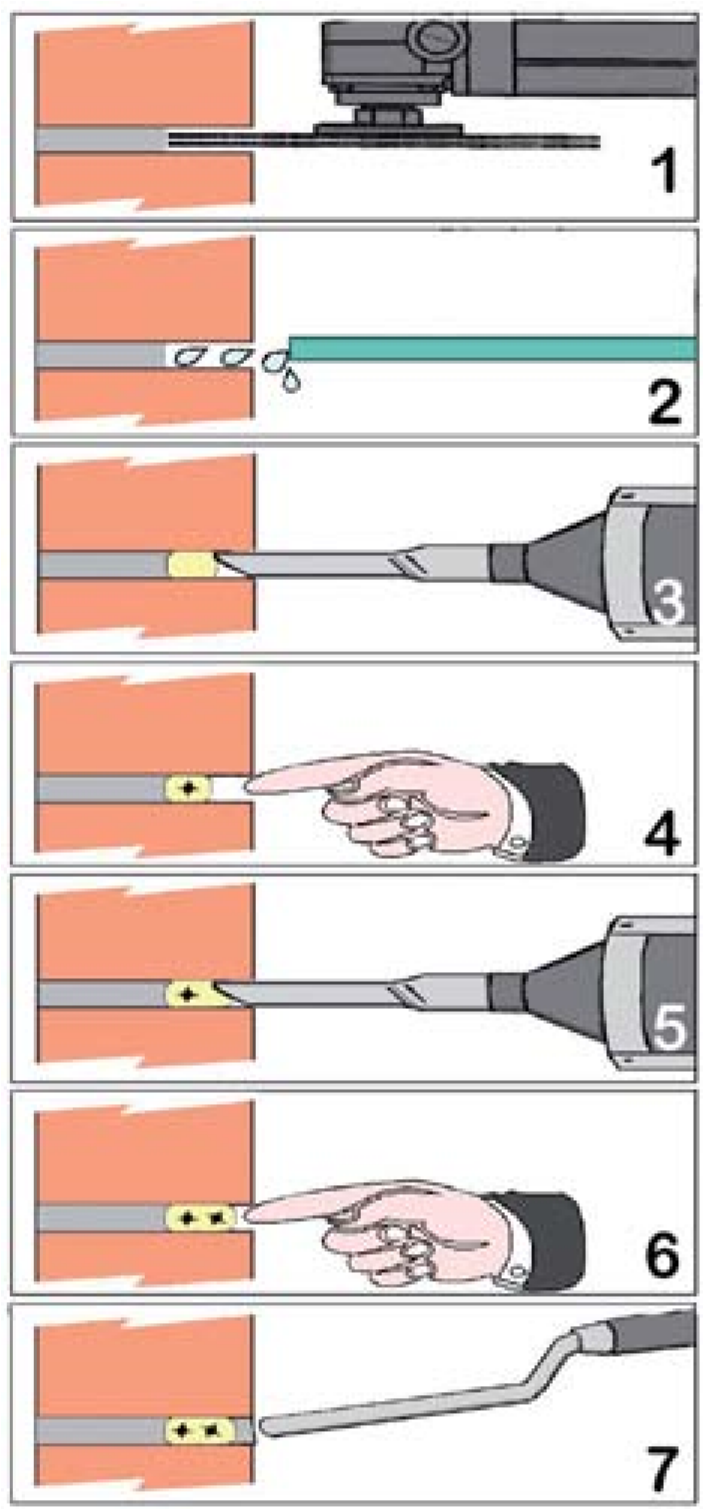
Cut two slots along the wall length, starting 500mm before one side of the window or door opening and ending 500mm beyond the other side. Space the slits at vertical centres of between 300mm and 900mm, which is between 4-12 brick courses apart.
-
Clear all loose debris from the newly chased apertures and use clean water to ensure they are thoroughly flushed out and wet-down before installation of the grout. Wetting the masonry reduces suction of the liquid from the grout.
-
Mix the powder and liquid components of WHO-60 grout and load the mixture into an applicator before pumping a bead of the specialist grout from the rear of the slots and fill them half to two thirds full.
-
Push a first helical bar into each grouted aperture, to about 75% of the slot’s depth. To ensure the rod is appropriately encapsulated, use a trowel or pointing iron to compress any displaced grout.
-
Pump a second bead of the WHO60® grout to fill each slot evenly to within 15mm of the wall surface.
-
Push the second bar into the grout, reaching around 50% of slot depth; this should always be at least 10mm from the first bar. Once again, trowel any excess grout to ensure full encapsulation of the rod.
-
Finish the process by filling any cracks in the reinforced zone and pointing the disturbed bed-joints to conceal evidence of the lintel repair. Disruption to occupants is minimal with the process, which eliminates the need for dismantling and rebuilding.
Twistfix have a comprehensive selection of helical bar products and structural repair solutions - please enjoy browsing the full range and do not hesitate to contact us for further information on choosing the right product for your particular project. Call us on 0845 123 6006 or email sales@twistfix.co.uk.
82 seconds
Related documents:
![]() Lintel Repair Method Statement
Lintel Repair Method Statement
![]() BRE Report and Load Tables - 6mm helical bars in WHO-60
BRE Report and Load Tables - 6mm helical bars in WHO-60